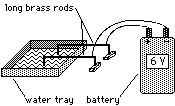
 Figure 1:
Water Tray Setup
 WATER TRAY AND ACCESSORIES:
To investigate electric fields with the water tray, you need to do the following:
 Figure 1:
Water Tray Setup
To measure the electric field resulting from the charged electrodes, you will use a probe connected to a voltmeter (see Figure 2, below). The voltmeter will measure the electric potential difference (see Fishbane, chapter 25) between the two metal points on the probe when they are immersed in water. This potential difference, measured in volts, is proportional to the component of the electric field parallel to the line joining the two metal points. See Fishbane, section 25-4 for specific details and examples. For best results, turn the voltmeter to measure potentials in the two-volt range, as indicated in Figure 2.
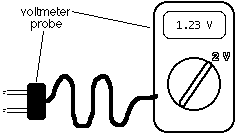 Figure 2:
Electric Field Probe THE DIGITAL MULTIMETER (DMM)
| The DMM is a common piece of lab equipment that can be used to measure various electrical quantities, most often current, resistance, and potential. The DMMs you will be using are capable of measuring both "direct current" (DC) and "alternating current" (AC) circuits. Be careful about knowing which type of measurement you need to make, then set your DMM accordingly. | 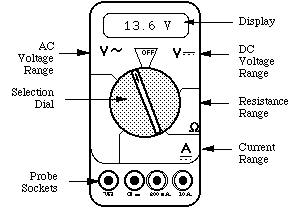 |
 |
The DMM can measure currents anywhere from 10 amps to
a microamp (10-6 amps). This versatility makes the DMM
fragile, because measuring a large current while the DMM
is prepared to measure a small one will certainly harm
the DMM. For example, measuring a 1 ampere current while
the DMM is on the 2 milliamp scale will definitely blow a
fuse! If you damage the DMM beyond repair, you will have
to finish the lab without the DMM. |
Measuring Current:
1. Set the selection dial of the DMM to the highest current measurement setting (10 amps). Insert one wire into the socket labeled '10A' and a second wire into the socket labeled 'COM'.
2. Attach the DMM into the circuit as shown below:

3. If no number appears while the DMM is at the 10 amp setting, move the wire from the 10A socket to the 200mA socket and then turn the selection dial to the 200 milliamp (200m) setting. If there is still no reading, change the dial to the 20 milliamp setting, etc.
4. When you have taken your measurement, return the DMM selection dial to the highest current setting (10 amps) and move the wire back to the 10A socket.
Measuring Voltage:
1. Set the DMM selection dial to read DC volts ( ![]() ). Insert one wire into
the socket labeled 'V½' and a second wire into the socket
labeled 'COM'.
). Insert one wire into
the socket labeled 'V½' and a second wire into the socket
labeled 'COM'.
2. Connect the two wires from the DMM to the two points between which you want to measure the voltage, as shown below

3. If no number appears, try a different measurement scale. It is a good idea to use a consistent method of trying different potential scales, for instance starting at the highest voltage scale and working your way down the scales until you get a satisfactory reading.
Measuring Resistance: The element whose resistance you are measuring must be free from all other currents (due to other batteries, power supplies, etc.) for the DMM to work. To measure resistance:
1. Set the DMM selection dial to measure ohms (½). Insert one wire into the socket labeled 'V½' and a second wire into the socket labeled 'COM'.
2. Make sure that the circuit element whose resistance you wish to measure is free of any currents.
3. Attach the wires across the circuit element, as shown in the example below.
![]()
4. If no number appears, try a different measurement scale.
Use a logical method that covers all scales, such as beginning at
the largest scale
(20 M½) and working your way down.
CATHODE RAY TUBE (CRT) AND ACCESSORIES:
Use of the cathode-ray tube and its relatives is widespread. It is the heart of many familiar devices, from the oscilloscope to the television. The following is a sketch of the tube you will be using and its connections. Compare Figure 3 to the CRT described in greater detail in section 23-4 (p.687) of Fishbane:
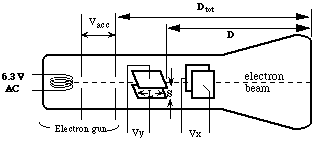
Figure 3: Cathode Ray Tube.
D=7.4 cm L=2.0 cm S=0.30 cm Dtot=9.6 cm
How the CRT works:
Within the electron gun:
Outside the electron gun:
To supply the necessary electric potentials to the CRT you will use a power supply. The power supply provided has the proper potential differences to heat the CRT filament and to accelerate the electrons. The power supplies we use also have built-in circuit breakers. Should you attempt to draw too much current from your power supply, it will shut itself off with an audible "click." If this happens, check to make sure all of your wires are connected properly, then press in the small white button on the side of the power supply.
Note that the CRT and power supply come as a set, and many of the connections are color-coordinated to avoid potentially damaging misconnections. You will also have an assortment of batteries which will be used to control the electric field between the CRT x- and y-deflection plates.
 |
WARNING: You will be working with equipment that
generates large electric voltages. Improper use can cause
painful burns. To avoid danger, the power should be
turned OFF and you should WAIT at least one minute before
any wires are disconnected from or connected to the power
supply. |
To properly connect the CRT to the power supply:
1. Turn the power supply off.
2. Connect the power supply ports marked "6.3 V AC" (they are green) to the ports marked "HEATER" on the CRT (these are also green).
3. Connect the appropriate accelerating potential across the cathode and anode. For instance, if your experiment calls for a 500 volt accelerating potential, hook the cathode to the port marked "-250 V" (which is white) and the anode to the port marked "+ 250 V" (which is red). This gives a total potential difference of 500 volts.
4. Turn the power supply on.
RESISTOR CODES
A resistor is a circuit element manufactured to have a constant resistance. The resistance of a resistor can be determined by the color bands (see the chart below) printed on the resistor according to the following rule:
R = (first-color number)(second-color number) x 10 (third-color number) ½
The fourth-color band tells you the tolerance of the resistor: silver means +/-10% tolerance, gold means +/-5% tolerance, and no fourth band means +/-20%.
Examples:

R = 10 x 102 ½ +/- 20% R = 56 x 104 ½ +/-
5%
| Color | Number |
|---|---|
| Black | 0 |
| Brown | 1 |
| Red | 2 |
| Orange | 3 |
| Yellow | 4 |
| Green | 5 |
| Blue | 6 |
| Violet | 7 |
| Gray | 8 |
| White | 9 |
THE HALL PROBE:
The Hall probe is a device that can be used to directly measure the strength of magnetic fields. Unlike using a compass, the Hall probe also allows one to measure the magnitude of the magnetic field. The Hall probe works by exploiting the Hall effect (see Fishbane, section 29-6). Charges moving in a wire are deflected by an external magnetic field, creating a separation of positive and negative charges in the wire. The extent of this charge separation can be measured with a voltmeter; the stronger the magnetic field, the greater the charge separation and potential difference. It is then possible to measure the magnetic field in terms of the potential it induces in a Hall probe.
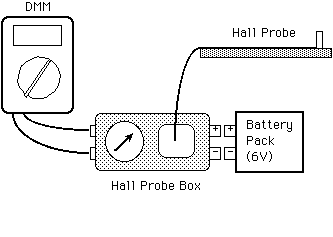
Your Hall probe apparatus consists of the following (see diagram below):
To prepare your Hall probe to measure magnetic fields:
1. Attach your DMM and Hall probe to the Hall probe box. The DMM attaches to the green and white ports on the Hall probe box; it is unimportant which DMM terminal goes in which port on the Hall probe box. Set your DMM to measure DC voltage.
2. Attach your battery pack to the Hall probe box with the positive banana plug of the battery pack fitting into the positive socket on the Hall probe box.
3. Now calibrate your Hall probe. To do this:
a. Set your DMM to the 20-volt scale, and make sure that your
Hall probe is far (at least 1 meter) from any sources of magnetic
field, such as magnets, currents, batteries, or power supplies.
b. Adjust the calibration knob until the DMM measures zero volts.
c. Change your DMM to the 2-volt scale; this allows a more
precise measurement of the potential from the Hall probe. Adjust
the calibration knob again until the DMM reads zero volts.
d. Continue in this fashion until the potential your DMM is measuring reads as close to zero volts as you can. With a steady hand, it is possible to calibrate your Hall probe to within +/-0.5 millivolts of zero.
Your Hall probe is now ready to be used to measure magnetic fields. The voltage shown on your DMM is proportional to the magnetic flux through the face of your Hall chip.
THE LARGE PARALLEL COILS (LPCs):
The LPCs (sometimes called "Helmholtz coils") are two coils of wire designed so that, if each coil bears the same current, the magnetic field in the region between the coils is very nearly constant. This property is explained in Fishbane, problem 30-51. The coils used in these exercises conform to the following specifications: